I've been asked to make a tutorial about how I work a couple of times... I strongly doubt that I can really make the sort of "how to" that explains exactly how I work, but let's just call it a walkthrough. :) The digital technique is easy enough. This works with pencil shadings as well, by the way--but I'm afraid I'm not the right person to tell you how to learn watercolour. :) Experimenting is the best for that, I think.
The pic I decided to document is this one... It's a rather complex scene with many people in it. It's one of those "missing moments" from the Silmarillion: A peek inside Feanor's home in Valinor, which I imagine must have been quite noisy.
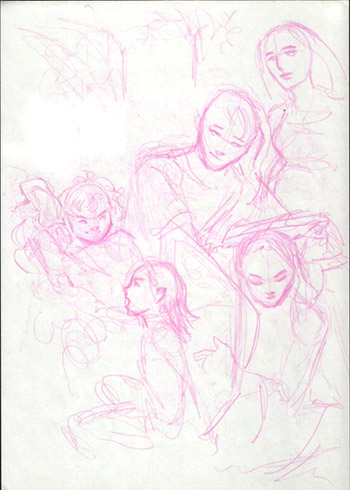 1. I start with a fairly loose sketch, using a mechanical coloured pencil. Those marvellous things (Pilot Color Eno, they're called) are eraseable and can just be filtered out in Photoshop after the sketching. This one's magenta; I also use cyan, orange, or yellow, depending on what my art store has in stock... I clear them out twice a year. This is to make the basic layout, who goes who, and some work on the expressions. 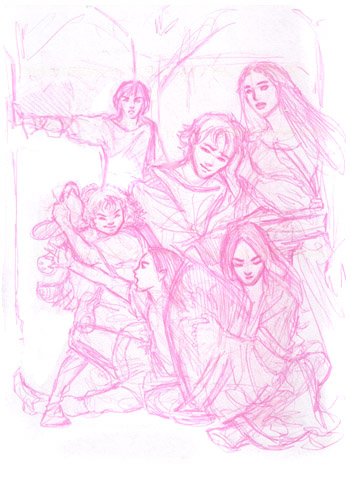 2. The finished scribble. I stuck to my initial outlines, only added the missing limbs, reworked Nerdanel a bit and gave Maedhros a quill to write with. At some point, I decided I could make Feanor make an appearance to complain about the noise. :) I suppose he's just working on the Silmarils. 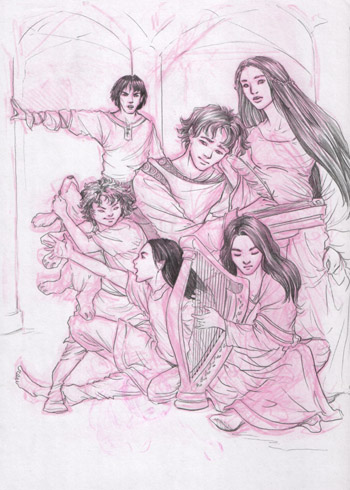 3. I then "ink" my pics with a pencil. I used to take only mechanical pencils but have returned to notmal ones; they just result in more dynamic lines. Here you see the pencil inking right over my colour pencil scribble. 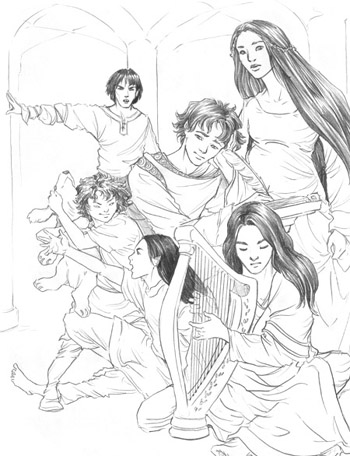 4. I scan in my drawing and filter out all that's magenta, which leaves nothing but the clean lineart. Then I decided that Maglor looked too much like a girl with that cloth folds across his legs, and erased the leg again in Photoshop. I print out this lineart onto watercolour paper. I can still make pencil changes on the watercolour paper later (such as Maglor's leg). I also made a few changes using the lasso tool and "Transform"--Maedhros looked much too big, conveying the impression he was the father. So I enlarged Nerdanel, the mother, and also little Maglor in front. I often do tweaks like this in Photoshop before shading, sometimes correcting anatomical mistakes as well, which I didn't see during the sketching. 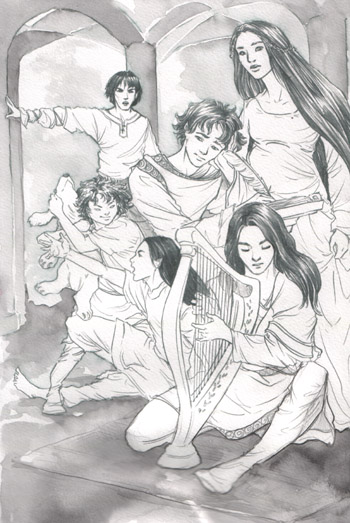 5. The paper needs to be as thin as possible in order to go through the printer, but it works very well with my five-year-old HP desk jet. The printer toner doesn't smudge when I watercolour, as long as I don't go over the lines too often and with too much vigour. It does go slightly green though. I start with a very loose background, using lots of water. I like these kinds of sketchy backgrounds. And yes, that's right--I use black and grey watercolour only. It gives me greater control over light and dark contrast if I don't have to worry about colours yet. Apart from that, in a "real" watercolour, I have to touch up all the colours digitally anyway....but to counter often-asked questions, yes, this is all done with an actual brush and real wet watercolour. :)  6. Now the watercolouring job is done; I've made the figures darker than the background to set them off. Feanor is lighter, to convey some depth.  7. And NOW for the magic! I scan this watercolour and touch it up a little in Photoshop (reduce the saturation so the greenish tinge from the printer toner disappears, sharpen the edges, and so on) and have the greyscale watercolour as my bottom layer. I open a new layer for the skin on top of the watercolour shading and call it "Skin". I now set the layer properties from "Normal" to "Colour". And that's the whole trick. This layer mode works like this: It changes the hue ONLY OF WHAT IS ALREADY THERE. So, when I go over this with the Photoshop brush tool, what is white stays white, what is light grey becomes light skin tone, what is dark grey becomes dark skin tone, and what is black remains black. You can see the skin still looks quite flat, however. That's because the shadows are the same tone as the highlights and the rest, only darker. So let's move on to the next step...  8. Now, I add more layers for each colour I apply. I often have around twenty layers, especially in a pic as this. You can see the skin has more depth now; I overlaid the shadows with purple, and added red hues around mouth, nose and ears--all on different layers, all set on "colour". Another layer has the red hair, yet another the background, others Maedhros's clothes and Nerdanel's dress. The ornaments on his tunic are again another layer. When you use this method, the Photoshop colours you take from the palette come out really, really saturated; I always desaturate them. 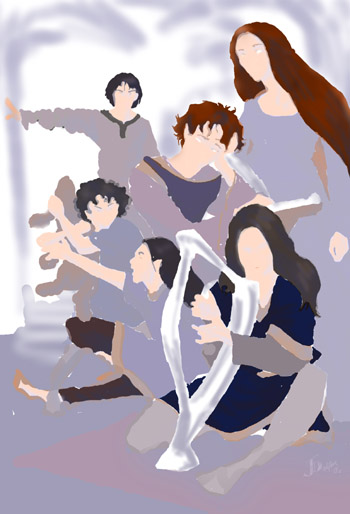 9. THIS is the whole digital colouring job--with the watercolour layer blended out! You see how sloppy it is? No need to work carefully. The watercolour shading layer defines the lines. 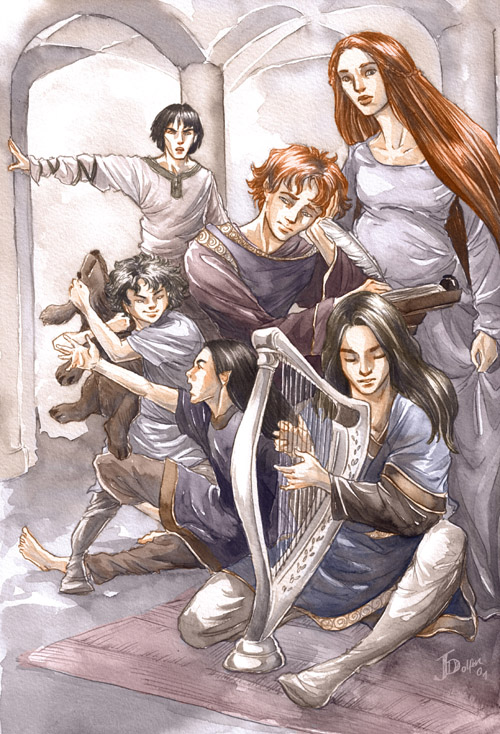 10. And this is the result! Hope you enjoyed our little walkthrough! :) Jenny |